What to do? Make her some cute outfits without spending to much. A perfect example is this plain t-shirt I picked up at Target on sale and then I added a beautiful embellishment made with scraps of fabric to spruce it up. Now doesn't it just look pretty?
During clearance sales I'll stock up on t's of different sizes for both of my kids (and for gifts) to use the following year. I'll then add a little extra to make them look special, expensive even. Ha. I've even used white undershirts to decorate/embellish. Remember this tie t-shirt?
Now for that tutorial:
To begin you will need:
When you choose your fabric pick fabrics that coordinate, but aren't too matchy matchy, that way you can see the contrast between each layer of the flower. Or if you aren't looking for too much contrast you can stick to just one pattern. Either way it will look beautiful.
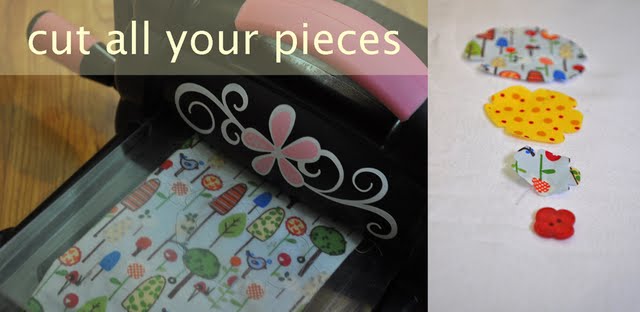
Don't get scared if you don't have an die cut machine, you can very well make a very similar flower simply by hand cutting it, that is what I would do (and still do for certain projects) before I got my machine. In fact, I think many times the hand cut imperfections make it that much more special.
To begin:
Then layer them and sew them together by hand.
Once you've sewn all the layers together and added the button, your flower is ready to get attached to the plain t-shirt.
Spread out your t-shirt and play around until you find the right spot for your flower (that kind of sounds kinky. Ahem.) Once you've found the perfect spot sew the flower onto the t-shirt.
When you sew the flower, to keep the bottom layer from rolling once you wash it (and to make it a bit stronger) sew about three x's around the inner part of the flower. Like this:
You are done! Totally easy don't you think?
I love simple projects!
I also love how the flower starts to fray and curl a bit after every wash.
Have a wonderful week creating! (And organizing!)


Wow! Que lindo y que facil. Yo nunca he sido muy buena con manualidades y no tengo una hija...pero aqui me tienes pensando a quien le puedo regalar algo solo por tratar de hacer esa flor!! Saludos.
ReplyDeleteSuper smart idea!
ReplyDeleteThis is so cute! We need some creativity in our lives, to make everything beautiful. Thanks!
ReplyDeleteI completely agree! ;)
ReplyDeletethat little layered flowers is super cute. so fun and inventive.... i make my own flowers pins and brooches, too! so much fun. And, I love ur graphics in the post. Cute! Save that money, mija!
ReplyDeleteThis is so cute! I'm not much of a fashion designer but this seems so easy and so creative. I will love to make one for my niece!
ReplyDeleteI loved it !!! so so cute... I will try it..!
ReplyDeleteThat is so cute.... I make little decals for my clothes all the time. :)
ReplyDeleteWow I love these type of activities because they are relaxing and you create something beautiful in the process. Thank you for sharing!
ReplyDelete