Showing posts with label tutorial. Show all posts

8.16.2012

DIY: Super Cute & Simple Felt Flower Magnets


In case you haven't noticed I have a love for flowers...and felt.  So it should come to no surprise that if I was to makes some cute magnets they would be made out of, yes, felt.

Any other felt lovers out there?  Mixed wool felt is my fave.  Nice and soft with such lovely colors.  Unlike the choices you get when you buy the cheap regular felt at your local craft supply store.


You can very well make these lovely magnets using fabric or paper even, what ever your little hear desires.  But if you like felt as much as I do, well go ahead pick out your favorite colors and follow along. The steps are super simple.

What you need:
- Assorted colors of wool mix felt.
- Crafting Jewels
- Fabric glue or a glue gun
- self adhesive magnetic strips

 How to make them:


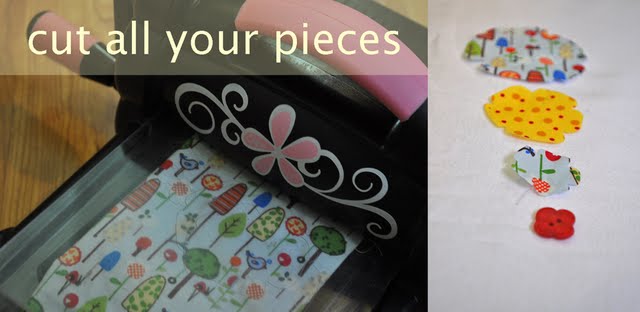
Begin by cutting out a large flower and a smaller flower.  You can hand cut them or use a die cut machine which is what I did.  (I have this one.  And love it.)


Glue the smaller flower in the center of the larger flower.  Let dry for a bit.


Pick out your favorite jewels. There's nothing fancier than a bit of bling bling. 


Glue them on the center of the smaller flower.

Now time to add that magnet.


 I used the ones above.  I picked them up at Walmart.  They also had round ones you can glue onto the back of your flower, but I liked the versatility of the strip.  Plus, nothing is easier than self adhesive ones.


Take one of the strips and cut it into three.


Stick them on!  Ah, simple.  I love it!

They are done, finished, finito!


Ready to hold all those important notes.

On a different note have I told you that one of my recent obsessions is Washi Tape?


It sure is.  Those little rolls full of color and stickiness are just pure fun.  Have you heard of it?  Imagine painters tape but in a much smaller cooler scale.  You can use it just about anywhere and if you get bored peel it right off.  I've been using them to stick art work on the walls, to spruce up some vintage suitcases and more. 

Look!  I used some to make this Family Color Coded Calendar. (Tutorial on how to at ModernMami.)


I love those polka dots!  I also have them in hot pink, and black and white, and stripes, and...you get the picture.  I bought mine from Pick Your Plum, but you can find them all over the web now.  Many Etsy sellers carry them too.  Try them and you'll be hooked.

*If your wondering about that adorable post card in the first photo.  It's by Marisa from Creative Thursday.  I love her work!*

Happy Crafting!

7.03.2012

Fourth of July Banner for ModernMami


Want to learn how to make this quick and super easy banner for the Fourth of July?

Click on to ModernMami.com to see the kids craft tutorial I made.

Happy Fourth!

3.05.2012

a recipe and tutorial

Hello there!

Just a quick stop to let you know I have a tutorial...

 Super easy to make!  And it will help you keep track of those dishes.  Are they clean or dirty?  Now you'll know! (click on photo to take you to the tutorial)

And a recipe...

Sopa de fideos, my to-go-to soup of the season.  Perfect for cold days, runny noses or just because!  Enjoy. (click on photo to take you to the recipe)

 Just for you!  Visit New Latina to read more.
 

Happy Monday!

2.07.2012

creative valentines week: security tinted envelopes heart garland tutorial


Have you ever seen how pretty the inside of security tinted envelopes are?  I really hadn't stopped to notice, until Maya from Maya*Made mentioned them a while back.  So I looked, and I loved.  (Thanks Maya!)  From that day on I started collecting them and using them in different art/craft projects.  (They also make a perfect matching game for the little ones!) I love coming up with new ways to use it.

And that is how the Security Tinted Envelopes Heart Garland was born!

So to make this:
(Yes, my little fashionista totally wanted to be in the photo!  I couldn't say no.)
You need lots of these!


The rest is pretty simple.


Materials you'll need:


♥ Many security tinted envelopes.  I was able to cut out one heart per envelope.  For my garland  I used a total of 17 envelopes. 
♥ Assorted colors card stock or craft paper.
♥ Two heart stencils in different sizes.  (I made my own by folding a paper in half and cutting out half a heart.)
♥ Heart hole punch (optional) or you can make your own tiny hearts (using the same steps as the heart stencil.)
♥ glue (I used good ole Elmers glue)
♥ twine ( a bit longer than the length of the garland)
♥ clear masking tape

Tutorial:


Begin by tracing the larger heart onto the security tinted envelopes and the small ones onto the card stock.  Cut them out.  Then hole punch a bunch of tiny hearts from the remaining scraps of card stock and/or envelopes.


Time to start sorting!


I first sorted them out on the floor to see what pattern I wanted.  Once I was satisfied I then decorated several hearts by gluing the smaller card stock hearts and a couple of tiny hearts here and there.  Let it dry for a few minutes.  Then I taped the finished hearts to the twine.  Listo!


A festive heart garland to decorate your home.

Happy crafting!

2.06.2012

creative valentines week: heart pendant tutorial

Well hello there!  Are you surprised to find two posts for today?  Technically the first one wasn't truly a post, more of an announcement (which by the way, if you entered any of my giveaways last week, you can check here if you won.)

This week I will be focusing on everything Valentine.  From making sweet little things for those you love, to decorating your home.  All simple, yet fun crafts for you and/or your little ones to make.  Make sure to stop by through out the week, there just might be that little something you were looking for to make for V day.

Are you ready?

 
A perfect gift for a friend, a sister, or mom.  Simple to make and lovely to wear year round, not just on Valentine's Day.

 Tutorial:

You can pick up the heart pendant just about anywhere.  I can't exactly remember where I bought mine (either Micheal's or Joann's) on clearance.  When I visit any craft store (or any store for that matter) I tend to hit the clearance sections first and see what treasures I can find for a good deal.  I buy them and save them for later. 

The strand I used is from some leather and suede stash my mom gave me years back.  But, you can very well use foe suede for this project.

To assemble the necklace all you need to do is:

That's it.  Easy peasy. 

Tie it in the back with a knot.  Wear it, or gift it to a special friend. I know I will.

Happy crafting,


1.25.2012

celebrating three years: flower brooch mini-tutorial and giveaway

 Now that was a long title!

Yes, you read right, it has been three years since this baby of mine (sort-of-say) was created.  Three wonderful years of sharing bits of our lives, of sharing tutorials and recipes,  and sharing lots and lots of photos!  Like my babies I have seen it grown, slowly at times, but grown non the less.  Through this blog I have met other wonderful bloggers, some in person others through the never ending cyber world.  Through this blog I have kept a record of sorts of our lives.  And through this blog I have managed to keep myself going and inspired.  I love this little blog of mine, but what I love the most is those of you that continue to come back week after week to see what I've been up to.  Thank you, I mean it from the bottom of my heart. Thank you. Thank you. Thank you.

To celebrate my THIRD BLOGGIVERSARY  I have some lovely giveaways lined up for you throughout the next few days.  Starting today! But before we continue on with the giveaway, how about a mini-tutorial, shall  we?  


Upcycle Flower Brooch Mini-Tutorial:

To begin, you will need to find some pieces of linen.  Look for some old linen bags, skirts, pants, sacks.  Anything that you can find that you no longer need or use would work perfect (and it'll make you feel good to create something new out of something old. Yey.) 

I happened to have these bags sitting in a drawer waiting for that perfect project.  One of them held a beautiful handmade gift brought to me by a friend from Peru, the other some lovely wood toys for the kids fairy tree house

Other materials you will need are thread, needle, die cut machine (if you have one) or a handmade stencil (if you don't), button, and brooch pin.

Once you've gathered all your materials follow the first steps from the simple embellishments tutorial, come back after you've sewn the flower together.  (Click button bellow.)


Once you've gathered your flower and added the button, begin to fray the edges:
Finally, sew the brooch pin on to the back of the flower.
 Done!  Finito!  Listo!
Now you have a beautiful vintage-look-like-up-cycle-linen brooch! (Phew!  What a mouthful.)
(you can also leave the edges untouched)

Wear it on your scarf...
Wear it on your hat...

Wear it where ever you like!

Giveaway is now closed.  Winner will be announced Monday Feb. 6th.  

Now for that giveaway:
One lucky reader will win one of these linen brooches.  All you have to do is leave a comment telling me what you enjoy the most from this blog.  That's it.  I will select the winner using random.org.  Please only leave one comment.  If you make a mistake erase the first comment and re-post.  Giveaway is open until January 31st midnight.  I will announce the winner on Monday February 6th.  Good luck! 

1.17.2012

simple embellishments that make a difference: a tutorial

I've noticed that as my spunky nena grows, I like less and less the clothing choices to buy out there, unless I spend a good fortune!  And since I'm as thrifty as one can be, well, I refuse to spend such amounts on a piece of clothing she (and her big brother) will out grow in a blink of an eye. 

What to do?  Make her some cute outfits without spending to much.  A perfect example is this plain t-shirt I picked up at Target on sale and then I added a beautiful embellishment made with scraps of fabric to spruce it up.  Now doesn't it just look pretty? 

During clearance sales I'll stock up on t's of different sizes for both of my kids (and for gifts) to use the following year.  I'll then add a little extra to make them look special, expensive even.  Ha.  I've even used white undershirts to decorate/embellish. Remember this tie t-shirt?  

Now for that tutorial:

To begin you will need:
When you choose your fabric pick fabrics that coordinate, but aren't too matchy matchy, that way you can see the contrast between each layer of the flower.  Or if you aren't looking for too much contrast you can stick to just one pattern.  Either way it will look beautiful. 

Don't get scared if you don't have an die cut machine, you can very well make a very similar flower simply by hand cutting it, that is what I would do (and still do for certain projects) before I got my machine.  In fact, I think many times the hand cut imperfections make it that much more special.

To begin:
Then layer them and sew them together by hand.

Once you've sewn all the layers together and added the button, your flower is ready to get attached to the plain t-shirt.

Spread out your t-shirt and play around until you find the right spot for your flower (that kind of sounds kinky.  Ahem.) Once you've found the perfect spot sew the flower onto the t-shirt.

When you sew the flower, to keep the bottom layer from rolling once you wash it (and to make it a bit stronger) sew about three x's around the inner part of the flower.  Like this:

You are done!  Totally easy don't you think?
I love simple projects!
 I also love how the flower starts to fray and curl a bit after every wash. 

Have a wonderful week creating! (And organizing!)