Showing posts with label cards. Show all posts

6.11.2012

Kids Craft: Super Large Card


Recently, the husband of my son's kindergarten teacher passed.   The class wanted to do something special for her, something to let her know they were all thinking about her.   What better way to say it, than with a Super Large Card, signed by every single student in the class!

My little guy and I took the task of making the card and then we took it into his class for every one to sign.  The size was perfect to fit all the wonderful large signatures 5 and 6 year old's tend to make.

I used the same simple idea that we used to make the Mother's Day Card for Abuelita (grandmother.) (seen here)


To make you will need a:
☺blank poster board
☺green marker
☺various colors and patterns of craft paper
☺stamping ink
☺butterfly stencil
☺glue


Fold the poster board in half.  Then begin by making your super large flowers.  You can do this by either drawing them free hand or by using a large canister as a guide: On the reverse side of each flower, I used as a stencil an empty chocolate canister to draw  a circle and then I drew the loops (petals) for each flower.  To make the center of the flower, I used a smaller canister to trace. 

To make the petals simply draw one in a tear drop shape and then use that one to trace the rest.  Nice and simple.

When you are done cutting all the flowers, center circles and petals, then glue them onto your poster board.  Play around until you find the right spot, before you permanently glue them.  (My little guy took quite a while deciding what will go where.)  Once glued, glue the center on the flower.  Draw your stems using a ruler to guide you.  (I did this for him.) Glue the leaves.

To make the butterflies you can either make your own stencil or use a ready made one.  Place your stencil where you want the butterfly, tape the sides (or hold firmly) of the stencil.  Begin stamping by turning your ink pad over and slowly dabbing it over the butterfly stencil.  When done, remove stencil carefully.  Draw decorative dots around the edge of the butter fly, also add the antennas.

You are all done!  Ready to give to someone SUPER special.


***

On a side note I am super excited that in August 7 they will be releasing the movie DR. SEUSS’ THE LORAX.  We love anything Dr. Seuss.  And since we didn't get to see it in the movie theaters, we can't wait too is it at home, all curled up on our couch, covered with a soft warm blanket and with some yummy popcorn to munch on.  

Here's a little preview:


Happy crafting!


5.10.2012

Make a Heartfelt Card for Mom


This year I wanted to make an extra special card for my mom.  Something that shows her how much I love and appreciate all she's done (and continues to do) for me.  After all, I have been blessed with the most fantastic mother in the world! 

After searching through my stash of goodies around my craft room.  I remembered I had been reorganizing some old photos.  Bingo!  I could definitely use one of those old photos.  One of...me!  I choose one of me when I was just a few months old, and began to work.

Do you like it?  Would you like to make one?

It is mighty simple.  First thing though is finding that perfect photo.  It can be one of you as a baby, or one of your kids (hint hint dads out there!)  Because mine was an old photo (vintage for today's standards) I decided to continue with the same vintage feel.  I gathered some lovely vintage lace and trims that, coincidental, my mom had given to me.  Made a flower embellishment (for how to click here) out of old book pages and another out of re-purposed  linen bags.  But you can very well use pre-made embellishments to make yours. 

Ready to make that card?

What you need:


♥ A photograph
♥ Book pages.
♥ Lace and/or trim
♥ Flower embellishments
♥ Stamp & ink
♥ Card stock
♥ All purpose glue
♥ Craftbooking tape

How to make it:


Begin by cutting your card stock in half. Also, if you are making your own, cut out the flower layers for the embellishments.  Then cut to the lace measuring the length of the with of your card.


Once you cut your card stock in half.  Take the top one, and begin to stamp around the edge of the card.  You can do this with a stamp or an ink pad. 


Then tape your photo onto the card.  I just taped the corners, just in case my  mom chooses to remove the photo, but the card itself can become an album page.  Do the same thing with the embellishment.  Again, I only taped on the sides that wouldn't damage the photo.


Glue the trim carefully over the photo (I only glued the bottom part of the trim- not directly over the photo), and then glue the second trim.  Finally, add another embellishment. 


For the final step, place the second piece of card stock (that you previously cut) under the finished card.  Line them up identically and then hole punch two holes, on the upper edge of your card leaving about  and inch of distance from the edge.  Add ribbon and tie into a bow.

You are done!  Open up your card and add beautiful words of love to that wonderful mom of yours. 


Happy Mother's Day to all the wonderful mami's out there!

2.12.2012

valentine's day lunchbox surprise (a tutorial)


As you know this is my little guy's first year in school.  For Valentine's day I want to surprise him by putting a little something in his lunch box.  I didn't want candy, nor the usual valentine card.  I wanted something special, something that represents us as a family.  So I made him this:


A tri-fold mini card tucked in a pillow box full of heart confetti!  Fun! Fun! Fun! (Sorry cafeteria staff.) 

This is so amazingly easy to make, that you can get it all done the night before and have it ready in the lunch box by love day.  Yes that easy.

Here is the how to.


Materials needed:
♥  one empty toilet paper roll.
♥  a piece of paper to decorate the pillow box.  (about 2 x 6 inches long)
♥  another larger piece of paper to make the tri-fold card.
♥  coordinating scraps of paper to decorate your card. (I ♥ U)
♥  heart hole punch
♥  raffia to tie around the pillow box
♥  craft glue

Tutotial:

Begin by folding your larger (but not larger than the pillow box) piece of paper in three.  Like an accordion.

Draw a heart on the opposite side of your folded paper.   To cut the heart (without cutting the connecting parts) make sure to leave a blank space in your heart drawing right where the paper folds.  This helps me a lot, because I often forget I am cutting a tri-fold (or get distracted) and end up with three hearts vs a card!  Ha!


Open up your tri-fold card.  Then round up the edges of the first and last heart.


Now cut your words.  I chose a simple I ♥ U. Easy for him to read (and for me to make.)


Glue them in place and let dry.


While it is drying you can either hole punch a lot of little hearts (circles if you don't have a heart hole punch.) Or you can start working on that pillow box.

I totally love this part! Because you get to turn a simple every day item into something useful and pretty.


Here is a step-by-step:


What once was a toilet paper roll, is now a pillow box!


Okay. Let's decorate!

Take your 2 x 6 inc. long strip and glue it around the outside/center of the pillow box.


Then tie a pretty piece of raffia around the paper.  Knot, and trim the ends. 


Fill it with confetti and place the card inside.  Then place it in your little loved one's lunch box and wait 'till he/she comes home and tells you all about it!  (I can't wait!)


I also made one for my sweet nena so she doesn't feel left out.  I just have to figure out how I'm going to give it to her...maybe on her lunch plate.  We'll see.  

FYI.  I will be adding this tutorial to the Creative Valentine Week section.  You can just click on the button on the left bar which will be up until the end of the week.  After that, you can find it in the tutorial section (click on tab below the blog banner.)


On a different note.  We got some snow yesterday!  But it didn't stick around :(.  The kids were bummed, and honestly I kind of was too.  Now that the kids are older I look forward to playing with them in the snow, even if it is for a little while and the rest of the time I enjoy looking out the window holding a warm cup of tea or coffee.  Ha!  

Hope your having better luck than us.

Happy crafting!


4.12.2011

moving slowly ♥ moviendome despasio


Time seems to be moving so fast yet I can't seem to catch up.  My body is aching, my nose is itching and I feel weak.  Could be allergies.  Could be the beginning of a cold.  Who knows. As much as I love spring, its beautiful colors and warmer weather, I hate the allergies that come with it.  But that is life, right? We can't have it all. 

El tiempo parece estar moviéndose super rápido y no lo puedo alcanzar.  Mi cuerpo me duele, mi nariz no para con la comezón y me siento débil.  Puede que sean la alergias.  Puede que sea que me estoy resfriando.  Quien sabe.  Lo que si se es que por mas que me encanta la primavera, los preciosos colores y los días mas cálidos, odio las alergias que llegan con ella.  Pero a si es la vida ¿Que no? No lo podemos tenerlo todo.

So I move slow even though a have a million things to do.  Like a huge order of tutus to make (wich I'm happy about, yet a bit overwhelmed by). Write a few guest posts for some lovely blogger friends of mine.  Prepare for a coupon presentation (two friends and I are presenting this Friday) and well you get the picture...all that and dealing with the daily needs and wants of a family of four.  Mind you, I am not complaining just...moving slow.

Es que me muevo despacio, aunque tengo un millón de cosas por hacer.  Como una orden de falditas de bailarina (cual estoy muy contenta, pero a la vez me tiene super ocupada).  Oh escribir un par de posts para unas lindas amigas blogueras.  También hay que prepara una presentación de como usar cupones (que dos amigas y yo daremos este Viernes), y en fin, creo que me entiendes...todo eso mas todas las necesidades de mi linda familia de cuatro.  Ahora, no me estoy quejando solo que...estoy moviendome despasio.  

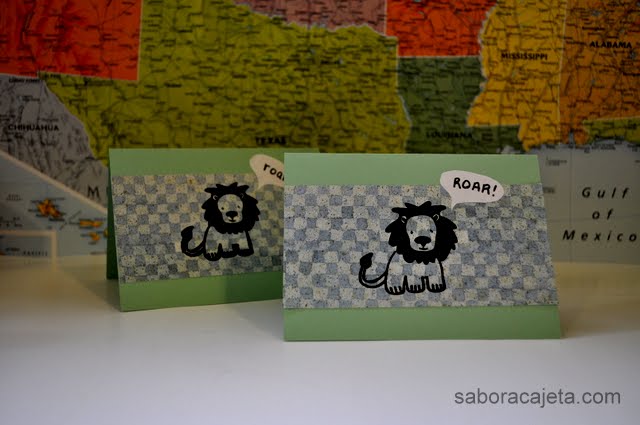
But in all that slowness I've managed to make some birthday cards for two nephews.

Pero a pesar de sentirme tal y como me siento, pude hacer un par de tarjetas de cumpleaños para unos sobrinos.  


If you would like to make some, they are pretty simple to make.  I used ready made carstock greeting cards with matching envelope and decorated them with some blue square scrap paper.  I then stamped it with an adorable lion stamp (I love stamps!) and then made a word bubble with white paper. 

Si te gustaría hacer una parecida, son fácil de hacer.  Use unas tarjetas y sobre ya cortados, después le añadí una tira de papel cuadricular (de las sobras que tengo por ahí).  Después las estampe con un sello de un Leon curioso (me encantan los sellos) y por ultimo corte una burbuja con palabras.  Y listo.


"Roar!"